


Cleaning & Maintenance Composite Fencing: The Ultra Decking Guide
So, you’ve purchased your composite fencing and you’re ready to install it!
Here at Ultra Decking, our composite fencing ranges have been designed with a user-friendly approach in mind. Assembling your beautiful, new synthetic fencing panels is a seamless process, which this comprehensive guide aims to demonstrate.
Table of Contents
Quick Review Of Benefits
If you are still deciding on the right fencing solution for your garden, let’s quickly cover the core benefits our composite material provides:
- Easy to Install and Versatile: Composite fencing is designed with flexibility and ease of construction at its core. The panels slot together simply, and all our kits are compatible with each style, allowing you to change your design on a whim.
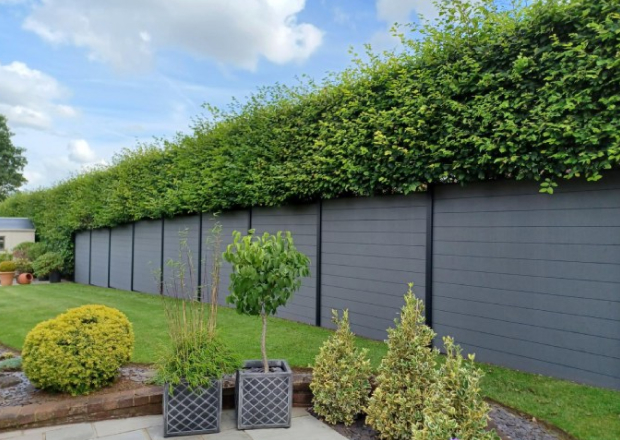
- Highly Durable & Weather-Resistant: Composite material will not rot, has excellent impact resistance, and provides decades of longevity (twice what you get with timber products).
- Lightweight and Easy-to-Carry: Much lighter than heavy hardwood timber panels, composite boards are easy to manoeuvre for a single person, making DIY installations a reality.
- Low-Maintenance Investment: Composite requires only minimal upkeep. [A simple monthly wash with soapy, warm water] is all it needs—no staining, sealing, or painting required.
- Colour-Fade Resistant: Built-in UV resistance preserves colour pigmentation, ensuring your desired shade stays beautiful for longer.
- Environmentally Friendly: Composed of recycled wood fibres and plastics, composite fencing lowers your carbon footprint by diverting waste from landfills.
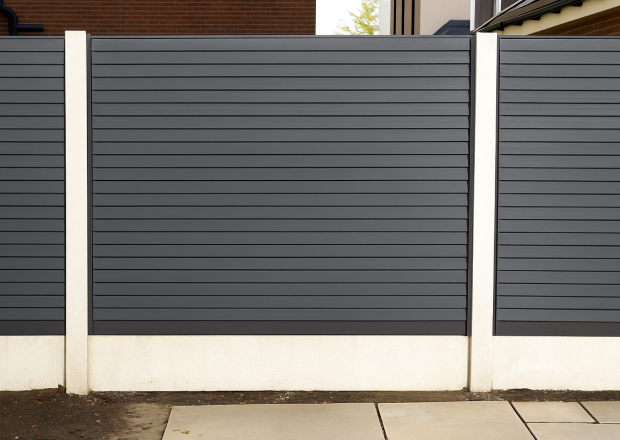
The Kit – What’s Inside?
Depending on whether you are retrofitting existing concrete posts or installing a brand-new fencing unit, we have a tailored kit ready to go. Each kit includes:
- Enough boards for your desired height (typically 10-12 boards for a 6ft fence, depending on gravel boards).
- An aluminium top and bottom rail.
- Either a pair of U-shaped channels (for existing concrete posts) OR 2x aluminium posts.
Preparation Before You Begin
Before you pick up a drill, you must prepare the site and materials. Failing to do this is the #1 cause of warped fences.
Acclimatise Your Boards – Skip at Your Own Risk! The number one cause of composite fence panel warping is neglecting to allow your boards to acclimatise to the environment. When you receive your delivery, place the boards safely and flat (to prevent bowing) in the area they will be installed for at least 48 hours.
This allows the material to naturally expand or contract with the local temperature. If you install them cold, they will expand massively on the first hot day, exceeding your expansion gaps and leading to unwanted warping.
Safety, PPE, and Tools Required When cutting boards down to size, fine dust is released. Protect yourself with the following:
- PPE: Dust Mask (N95), Safety Goggles, Grip Gloves, Hard Shoes.
- Tools: Tape Measure, Spirit Level, Pencil, Circular Saw (40-80 tooth blade for clean cuts), Drill, and a Shovel (if digging new posts).
Safety Tip: If using a ladder, use the 4-to-1 rule. For every 4ft of fence height, the base of your ladder should be 1ft away from the fence.
Measure Your Existing Bays (The Concrete Post Warning) If you are retrofitting existing slotted concrete posts, never assume your bays are perfectly uniform. Over the years, concrete posts shift, lean, and settle.
Standard composite fence boards are typically 1.83m long. However, once you slide your new plastic U-shaped channels into the concrete grooves, the internal width of your bay is reduced even further. Before you begin installation, measure the distance between every single post. This prevents any nasty surprises on installation day, ensures your 1.83m boards will span the gap, and lets you know exactly how much cutting you will need to do for narrower bays.
Installation Method A: Existing Concrete Posts (The Retrofit)
Use this method if you are keeping your old slotted concrete posts and upgrading the panels.
Step 1: Installing the U-Shaped Channels
Your kit includes Plastic U-Shaped Channels designed to slot into the grooves of your concrete posts, preventing the thinner composite boards from rattling in the wind.
- Place the U-shaped channels into the vertical grooves of your concrete posts.
- Mark the desired height with a pencil.
- Remove the channels and cut them to size using your saw.
- Slide them back in for a snug fit.
Step 2: Positioning The Bottom Rail
- Measure the distance between the inside of the two U-channels.
- Mark this measurement on your Aluminium Bottom Rail and cut it to length.
- Slot the rail into the channels and push it down to the bottom (or onto your gravel board).
- Use your spirit level to ensure the rail is perfectly flat.
Step 3: Measuring & Cutting Boards (The 3-4mm Gap)
Do not cut the board to the exact width of the gap; you must leave room for expansion.
- Measure the distance between the insides of the U-channels again.
- Deduct 3-4mm from your total measurement. This leaves a 1.5/2mm expansion gap on each side, allowing your boards room to breathe.
- Cut the boards using a fine-toothed circular saw.
Step 4: Insert the Boards & High-Wind Reinforcement
- Slide your first board down into the channels until it slots firmly into the bottom rail.
- High-Wind Protocol: If your garden is in an open field, coastal area, or unprotected by other structures, you must slide aluminium reinforcing inserts into the hollow chambers of the composite boards before stacking them. This adds critical structural rigidity and stops the boards from bowing under heavy wind loads.
- Repeat the process, stacking board upon board; the tongue-and-groove system will lock them together. (Warning: Never cut the boards vertically lengthwise, as this removes the locking mechanism).
Step 5: The Finishing Touches
- Measure and cut your Aluminium Top Rail to length and slot it onto the final board.
- Insert the provided Post Caps to create a seamless transition across the top. (Expert Tip: Concrete posts shift over the years. Never assume all bays are exactly the same width. Measure each bay individually!)
Installation Method B: Aluminium Posts (The New Build)
Use this method if you are excavating a new boundary line or building on a hard patio.
Step 1: Assess and Clear the Area
- Survey: Confirm there are no underground water pipes or cables beneath your post line.
- Permits: Check if you need planning permission (usually only required if the fence is over 2m high, or 1m next to a highway).
- Clear: Remove any roots or old cement that might obstruct the posts.
Step 2: Set the Posts (Urban vs. Open Locations)
The wind resistance of your location determines how your posts must be secured.
- For Soft Ground (Urban / Protected): If your fence is shielded by other houses or structures, dig a hole with a minimum depth of 500mm. Insert the aluminium post, pour in your concrete mix, and use a spirit level to ensure it is perfectly vertical while setting.
- For Soft Ground (Open Field / Exposed): If your fence is in an open area subject to high winds, you must sink the posts deeper to counteract the leverage. Dig your holes to a minimum depth of 750mm and set heavily with concrete.
- For Hard Ground (Concrete/Patio): If installing in a protected urban area, use our Bolt-Down Base Plates. Secure the plates to the solid concrete using heavy-duty masonry anchors, and slide the aluminium posts over the top.
⚠️ Critical Engineering Warning: We strongly advise against using bolt-down base plates in open fields or highly exposed locations. The “sail effect” of strong winds against solid panels creates massive leverage that can rip masonry anchors straight out of the concrete. In open areas, your posts must be dug into the ground and set with wet concrete for safety.
(Expert Tip: You must position the posts at the exact distance required for your boards, plus the 3-4mm total expansion gap. Use a cut board as a spacer to test the distance before securing the posts.)
Step 3: Installing the Boards & High-Wind Reinforcement
Once the concrete has set and the posts are sturdy and rigid enough:
- Insert the Bottom Rail first.
- High-Wind Protocol: Just like the retrofit method, if your area is highly exposed, slide your aluminium reinforcing inserts into the composite boards to increase structural rigidity.
- Slide in your boards (the typical amount for a 6ft fence is 12).
- Finish with the Top Rail.
The Golden Rule: Expansion & Contraction
We cannot stress this enough: Composite fencing needs space to expand! All wood-plastic composite products expand when hot and contract when cold. If you fit them too tight, the boards will hit the edge of the post in the summer heat and warp or bow under the pressure.
- The Fix: Always adhere to the 6mm gap rule when cutting your boards. When sliding boards in, they should feel slightly loose side-to-side, not wedged in tight.
Review Summary
- PPE: Goggles and mask on?
- Acclimatised: Have the boards rested outside for 48 hours?
- Gaps: Have you left a 6mm total expansion gap per board?
- Level: Is the bottom rail perfectly flat?
Still have questions? Our technical team is happy to advise on complex installs.
Next Article 
What Material Should I Use for My Rooftop Decking?
