menu

Up to 30% off | Only applicable to this Month | Free Delivery | Code FREEAPR

https://ultradecking.co.uk/wp-content/uploads/2025/07/Frame-2147225651.jpg https://ultradecking.co.uk/wp-content/uploads/2025/07/Frame-2147225651.jpg

How To Build Your Decking
Right: The Ultimate UK Guide

Building a deck might sound simple, but with so many variations such as raised decks, sloped areas, ground-level platforms, or installations over concrete, it can quickly become overwhelming. Each method requires different tools, techniques, and expertise.

  • July 16 2025
  • Allan Jeffrey
  • 2 mins read

Introduction

On this page, we will guide you through everything you need to know. Based on years of experience and feedback from thousands of UK customers and professional fitters, this is our complete guide to getting your decking right the first time. From planning and subframes to laying boards and adding the final finishing touches, we have you covered.

Need to jump to a specific section?

We have included a simple “Jump To” menu above so you can go straight to the part you need. For key steps, we have also added placeholders for videos and diagrams to help you better understand each stage of the process. Seeing how it is done can make all the difference.

Phase 1: Planning & Preparation

Do I Need Planning Permission?

Before you purchase a single board, it’s best practice to check the planning permission rules with your local authority.
You may come across information online or in forums suggesting that you typically won’t need planning permission if your deck:

  • Is no more than 30 cm (approximately 1 foot) above ground level
  • Does not, when combined with other garden structures, cover more than 50% of your garden area
  • Does not impact your neighbours’ privacy

However, planning regulations can be complex and vary by region. We’ve heard many stories of homeowners being forced to remove their decking after completion due to non-compliance.

Our advice is simple: always check and double-check with your local planning authority to ensure everything is approved before you begin your project.

Tools
  • Composite Decking Boards
  • C24 Graded Treated Timber (joists & posts)
  • Post-Fixing Cement
  • MOT Type 1 Hardcore or Gravel
  • Non-Woven Weed Membrane
  • Joist Hangers
  • Starter Clips, Hidden Fasteners
  • Galvanised Structural Screws
  • Finishing Trims (Bullnose / Fascias)
Materials
  • Shovel, Tape Measure, Spirit Level
  • Power Drill
  • Mitre or Circular Saw (80+ tooth carbide-tipped blade)
  • Safety Equipment

Preparing the Ground: Soft Surfaces (Grass or Soil)

Step 1: Mark Your Area

Use pegs and string to mark out the exact dimensions of your deck.

Expert Tip: A framing square can help ensure all corners are square.

Step 2: Clear the Surface

Get your shovel out and clear the entire area of all grass, turf, weeds, and large rocks.

Expert Tip: A framing square helps with corners.

Step 3: Dig Out the Foundation

Dig Out the Foundation: Dig out the entire cleared area.

Expert Tip: We recommend digging to a depth of at least 150mm (6 inches).

Step 4: Add Weed Control and a Solid Sub-Base

Lay a high-quality, weed control membrane over the bare soil first. Then, fill the area with at least 100mm (4 inches) of MOT Type 1 hardcore.

Expert Tip: A sub-base with proper drainage improves stability.

Caution: MOT Type 1 is the industry standard for creating solid foundations. Non-wovenweed membrane is recommended for its enhanced drainage. Once laid MOT Type 1, evenly, compact it down firmly
with a hand tamper or whacker plate to create a solid, level base that allows for excellent drainage.

Top tip: if you are placing your decking underneath trees, this will mean more accumulation of debris on your decking boards. Please note when building near or around a tree, stay at least 500mm away and do not fix to the tree.

Preparing the Ground: Hard Surfaces (Concrete or Paving)

Already got a solid concrete or paving base? Perfect . This can be the ideal foundation for your new decking, saving you significant time and money on groundwork. However, before you begin, it’s crucial to perform a quick 2-point inspection of the existing surface:

However, before you begin, it’s crucial to perform a quick 2-point inspection of the existing surface:

Check the Condition

You will need to investigate the condition of the slabs prior to constructing a frame on top of them. You will not be able to build the substructure on damaged or broken slabs, as this can lead to sinking and structural instability of the decking on top.

Remember that you need to ensure that there is no pooling on the decking surface, as this means the existing slabs don’t have a gradient already, which allows for surface runoff.

Check the Gradient:

Pour a bucket of water onto the patio. Does it drain away from your house effectively? If water pools anywhere, you will need to use adjustable pedestals for your subframe to create a proper gradient, regardless of which joist material you choose.

Once you’ve confirmed the base is sound, you need to choose the right joist material for this new subframe base. This is a critical decision.

Expert Advice: Once you‘ve confirmed the base is sound, you need to choose the right joist material for thisnew subframe base. This is a critical decision.

The top Mistakes to Avoid on Patios

The most common installation failure we see is when standard timber joists are laid directly on a concrete or paving slab base. Trapped moisture between the timber and the slab will cause the wood to rot incredibly quickly.

Timber joists & Adjustable Pedestals:

You must use adjustable pedestals to raise the entire frame off the ground. This creates a crucial air gap for ventilation, allowing the wood to dry out and preventing rot.

Pro tip: It is recommended that you use 8/9 pedestals for every square metre. Please note that c16 or c24 treated timber joists are highly recommended for any ground-level decking.

Composite Joists:

These are a brilliant “fit and forget” solution. Because their core is made from solid HDPE plastic, you’ll never worry about rot. They can be laid directly onto the concrete and bolted into position.

Pro tip: : Ensure you are using solid core composite or plastic joists and create a small gap that allows water and debris to drain freely underneath. Any adjoining, you will need a cross member and ensure a 10mm gap for expansion end to end and near any fixed objects.

Aluminium Subframe:

The ultimate long-term investment. An aluminium subframe is a true “fit and forget” solution with a Class A fire rating that will never rot, rust, or warp.

Phase 2: Building the Subframe

Calculating Your Posts (for raised decks):

First let’s create a rule of thumb on how many posts you will need for your project per sqm, as joist spacing are recommend at 1.5m lets use an average 20 sqm deck for this example, if you below this then you have use 1m or 0.5m to ensure structure strength on dimension you have. For a raised deck on soft ground, support posts should be spaced no more than 1.5m apart. Each post needs to be long enough to be concreted at least 750mm into the ground, plus the desired height of your deck example at 300mm. Note the height the deck the more post so in this case total post height each spacing is 1.05m.

Expert Tip: A typical 4m x 5m (20m²) raised deck would require around 15 posts at 1.05m – 15.75 linear metres. Based on a 2025 market price of around £8.82 per metre for a 100x100mm post, you can budget roughly £7.00 per m² for your posts for an average-height deck.

Note: during calculation and build the difference working out for free standing and attached to the house( p=post)

Start the Build Of Your Posts

Step 01: Dig the Holes:

For each support post, dig a hole that is at least 750mm deep or one-third the final height of the post, whichever is greater. Enhance you position posts no more than 1.5m apart.

Step 02: To support Drainage:

Add a few inches of gravel to the bottom of each hole. To prevent the timber post from sitting directly in wet soil and rotting, always place it on a concrete block or an engineering brick.

Step 03: Set the Posts:

Place your post in the hole and fill with post-fixing concrete, using a spirit level to ensure it is perfectly vertical. The most important part of building decking on a soft surface, such as soil, are the posts that support the decking’s stability.

As mentioned, you will need to dig holes 1.5m apart and 750mm deep to place your posts in. Put gravel or stones in the bottom of your holes to help with drainage, its also recommend to place your posts on brick to raise them from the ground, if so use engineered bricks or use a post sleeve, this will help to prolong the post life span.

Next, pour your postcrete mix and water into the hole to stabilise the posts in place, using a spirit level to ensure an accurate vertical post throughout the process. Allow the mix to dry. To stabilise your posts even further, you can screw batons at an angle into the post. If you notice that the base around the post is flat, its a good idea to taper the surrounding post (curve the around surrounding your posts) to enable the water to run off and not pool around your post, this will help with prolonging the post life span.

Expert Tip: As you fill the hole with concrete mix, use a stick to vibrate it to remove any air bubbles. For a fitter’s finish that prolongs the post’s life, slope the top of the concrete away from the post so water runs off.

Posts on existing concrete surface

When you are fixing posts to an existing concrete surface, you will need to anchor the posts to the ground with galvanised steel post anchor & concrete fixing bolts. Put the base support on the place you are installing the posts and mark 4 drilling holes with a pencil. Remove the base, and drill into the holes with a hammer drill and masonry drill bits.

Place the base back over the holes you have made, screwing them into place with your concrete fixing bolts.

Insert the post into the base, tightening the concrete fixing bolts with your spanner and ratchet to support the post into place. You will need to tighten the bottom two bolts first, as to ensure the post is fitted upright. Use your spirit level to retain an accurately vertical post.

Top tip :Clean dirt, debris, dust from the drilled hole, this can reduce the holding power of concrete fixing by over 50%

Choosing & Fitting Your Joists

How many joists will you need per sqm?

For composite decking, your joist centres must be no more than 300mm apart. A standard subframe will also require noggins between the joists for stability.

Example Calculation:
  • Internal Joists: 4 joist runs × 1m long = 4 linear metres
  • Outer Frame Ends: 2 joists × 1m long = 2 linear metres
  • Noggins: Approximately 1 row = 1 linear metre Total: 4m + 2m + 1m = 7 linear metres
  • Expert Tip: As a general rule of thumb, you will need approximately 7 linear metres of C24 joist timber for every square metre of decking. At a 2025 market price of around £2.45 per metre, you can budget roughly £17.95 per m² for your joists.
Expert Advice: The Problem with ‘Joists Per Square Metre’ Rules

You will often see generic rules online, like ‘you need 2.5 joists per square metre.’ In our extensive experience helping homeowners across the UK, this is an inaccurate and outdated way to budget for a modern composite deck. These rules rarely account for the strict 300mm joist spacing required for composite decking to be fully supported and warranty-compliant.

Option 1: Using Timber Joists

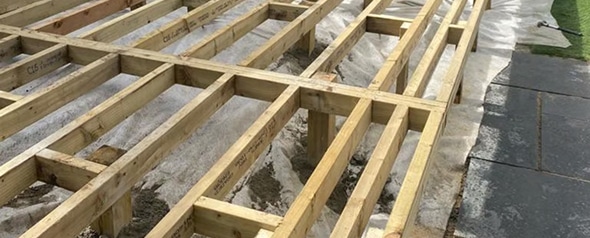
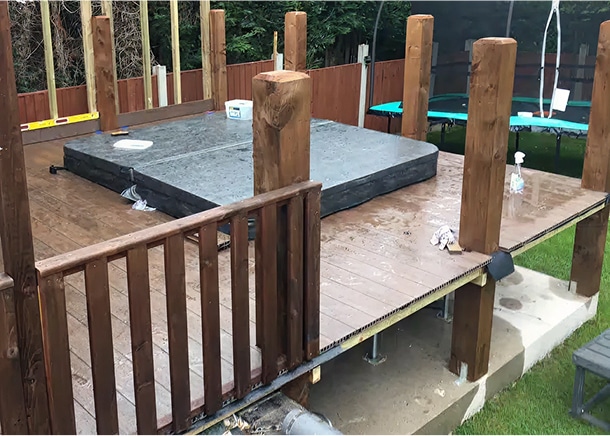
Starting You Build Of Joists
Choose the Right Joist :
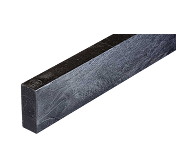
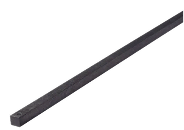
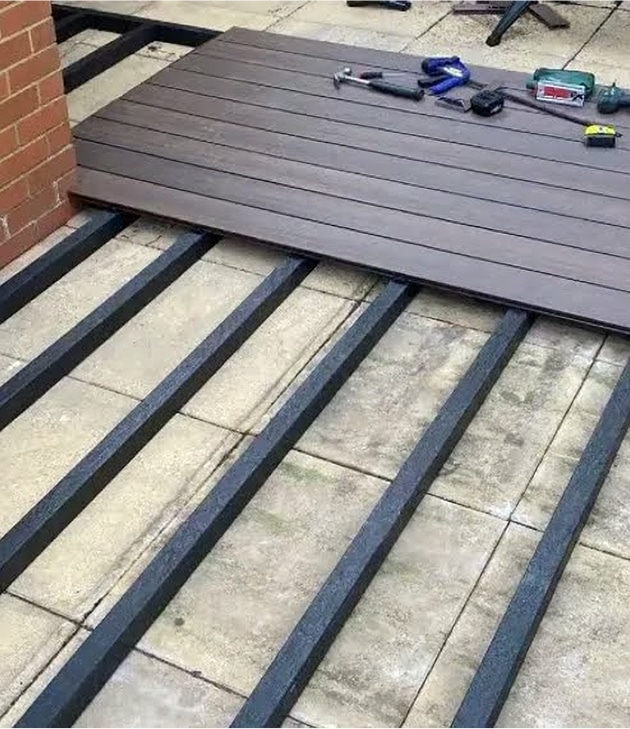
In our experience, the best option for choice of joist considering price and durability is a C24 pressure treated joist.
These joists provide long-term strength and performance.
We firmly recommend using the enhanced C24 graded pressure-treated wood for your joists.

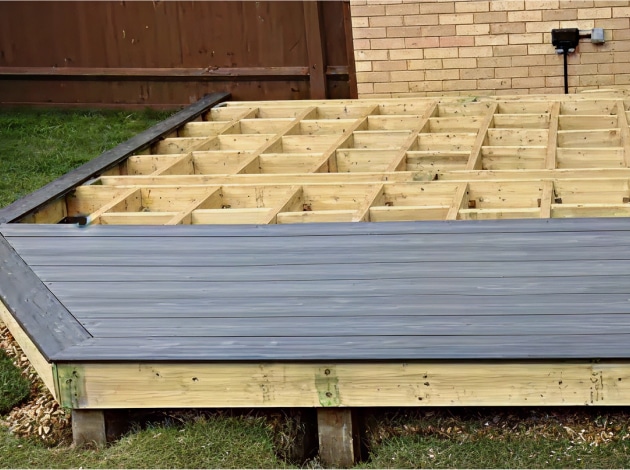
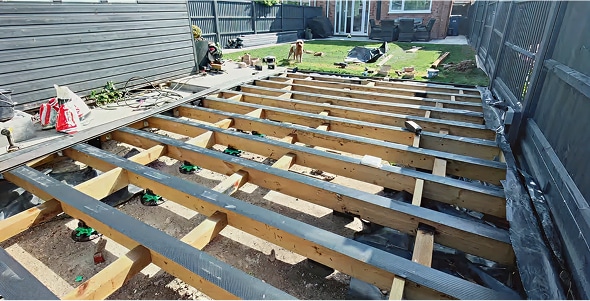
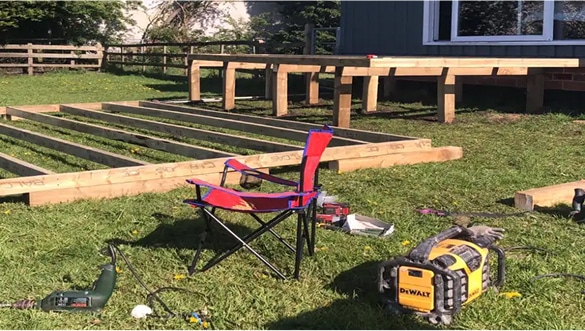
Build Your Outer Frame:
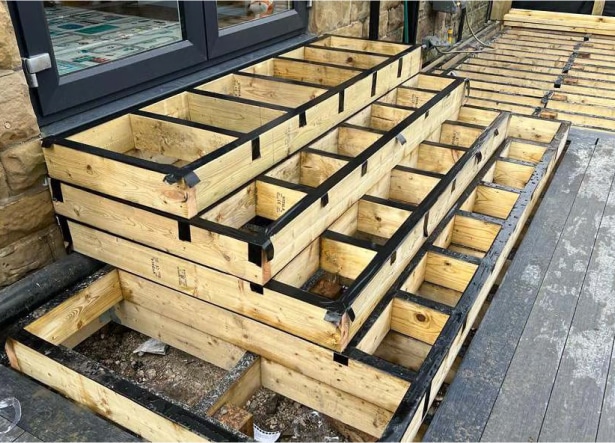
Most fitters find it easier and more accurate to build the main outer box frame first.
 Cut your C24 joists to size and fix them together with galvanised structural screws. You can even place the outer frame on the ground to check dimensions and mark your post positions accurately before digging.

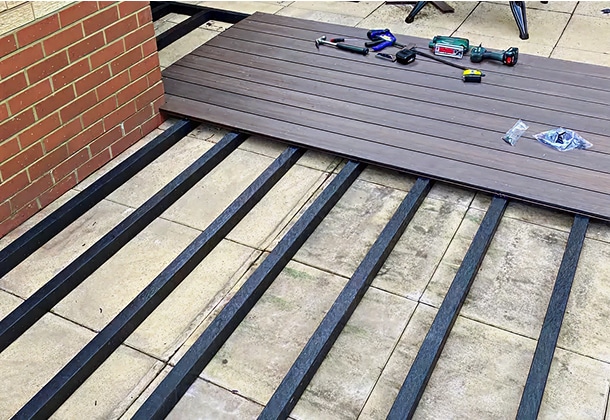
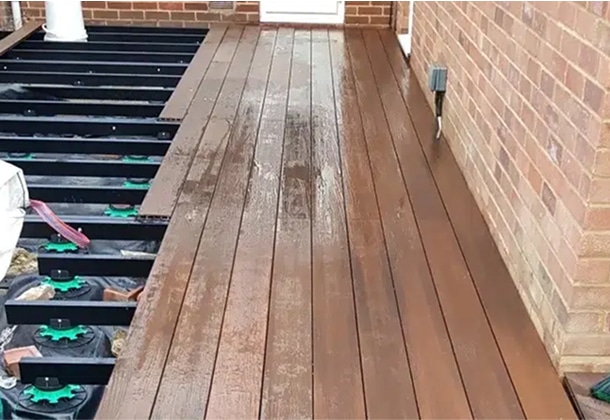
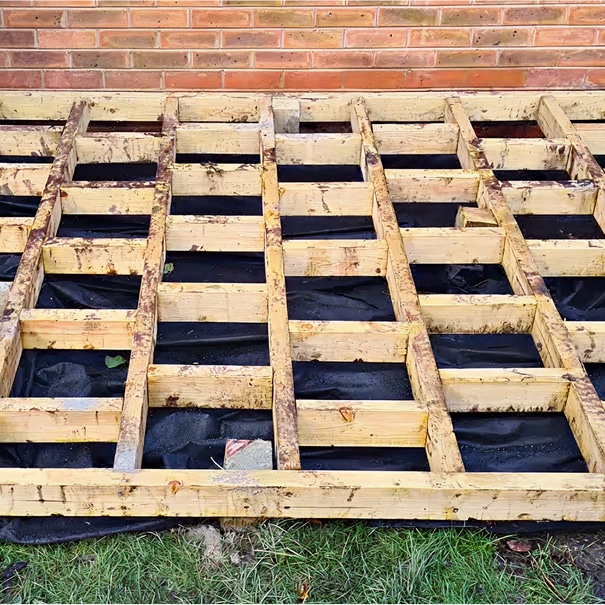
Install the Inner Joists:
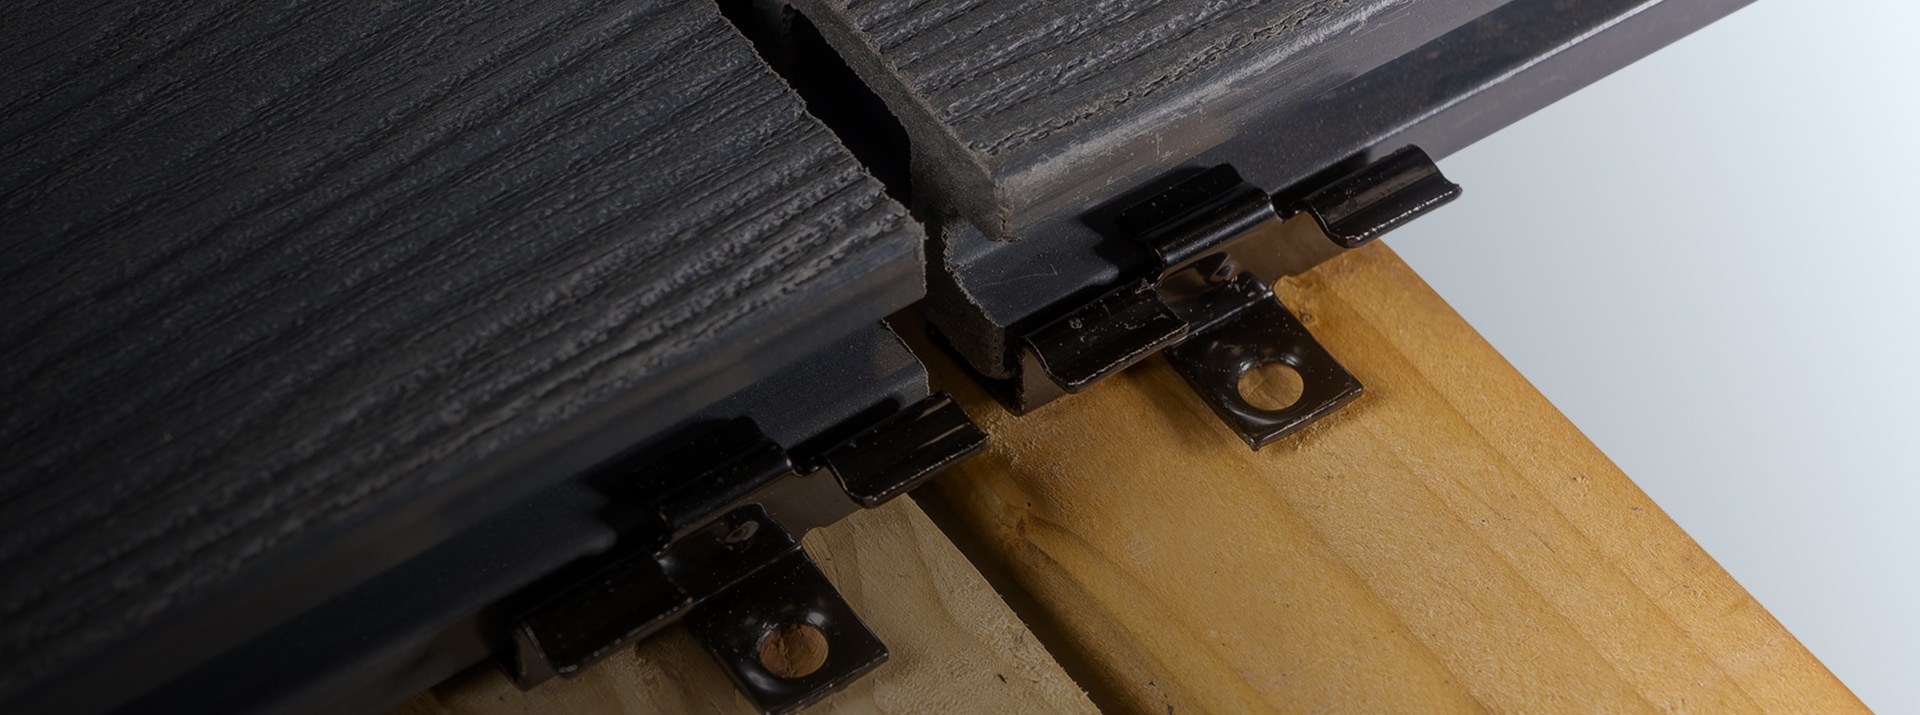
Attach galvanised joist hangers to the inside of your outer frame. Then, slot your inner joists into the hangers and secure them.

Add Noggins:
Fit shorter pieces of joist (noggins) in a staggered pattern between your main joists. This is a crucial step that many DIYers miss. It prevents the joists from twisting over time and adds huge rigidity to the entire frame.

Joist Spacing:
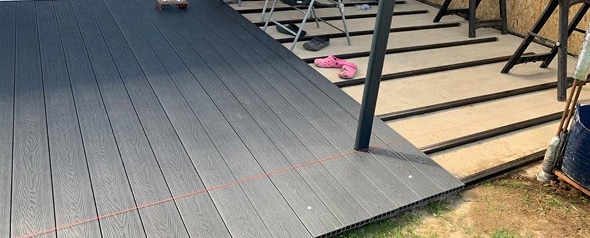
For residential decks, the space between the centre of one joist and the centre of the next must not exceed 300mm. For commercial projects or diagonal board layouts, reduce this to 250mm.

video-arrow

Expert Tip:
You can also pre-build a box frame in short sections that attach to each other. The benefit to this is you can check your measurements continually and easily mark where your post will be placed.re digging.

Option 2: Using Composite Joists Directly on a Hard Surface

Step 01: Lay a Weed Membrane

Even on a hard surface, it’s best practice to lay down a breathable weed membrane first to prevent any growth.

Step 02: Build Your Frame

Arrange your composite joists in a grid-like formation directly on the paving.
Ensure the space between the centre of one joist and the centre of the next is no more than 300mm.

Step 03: Anchor the Joists

Securely anchor the joists to the concrete base.
To do this, predrill through the solid composite batten (this will require more effort than drilling wood) and into the concrete below with a masonry bit.
We recommend using galvanised countersunk concrete bolts at 500mm intervals along the length of each joist.

Step 02: Handle Adjoining Joists Correctly

This is a critical step for structural integrity.
When two joist ends meet, you must:

  • Leave a 10mm expansion gap between them.
  • Securely fasten the two joists together using a “sister joist” (a short piece of joist screwed to the side of both) or a purpose-built joist cross-member.
  • Always use high-quality, galvanised structural screws for this connection.

Protecting Your Wooden Joists in the UK During Installation

Placing new composite decking boards can be expensive and time-consuming. But replacing damaged and rotting joists is much more trouble some. In many cases, you will need to build an entirely new frame. For this reason, it’s crucial to protect not only your boards but your substructure as well, including the joists.

Flash Your Joists

When building new decking or replacing old subframes, you will want to flash or waterproof your joists.

  • Flashing tapes are water-resistant adhesives or membranes laid on top of the joists.
  • It minimises water absorption while allowing the wood to release moisture on the uncovered sides.
  • Alternatively, you can also use tar paper as a substitute.
    You can find a variety of these in most DIY stores or builder’s merchants.

Use Sealants

Another easy way to protect your decking joists from moisture is by using wood sealants.

  • Applying them is similar to what you do for floorboards.
  • Water-resistant sealants provide full coverage for your joists, unlike flashing tapes which only cover the top.
  • It’s best to apply sealants to the subframe before installing the decking.
  • Re-applying them later can be trickier—but as long as you can reach the underside, it’s a solid protection method.

Allow for Proper Ventilation

Ventilation is crucial when designing and building a deck.

  • Wood absorbs water and moisture.
  • Without sufficient ventilation, it won’t release moisture properly, leading to:
    • Rotting
    • Warping
    • Insect damage
    • Fungal growth

For better ventilation:

  • Observe proper spacing between decking boards
  • Ensure correct joist spacing and span
  • Raise the deck to support drainage and airflow

You may also want to check your local building regulations or the manufacturer’s installation guides, or consult a professional for insight.

Use Water-Resistant Material

Choosing the correct materials for your joists is crucial.

  • Check your local building regulations to know what’s permitted.
  • Without sufficient ventilation, it won’t release moisture properly, leading to:
  • You can also use non-wood alternatives such as plastic or composites.
  • Avoid untreated wood, unless it is naturally resistant (like Cedar or Redwood).

Please remember:

  • To increase your subframe’s moisture resistance:
    • Add a breathable weed membrane
    • And don’t forget to add aggregate or gravel to prevent moisture build-up below your deck.

Phase 3: Laying the Decking Boards

Cutting Composite Decking

Having sold composite decking for almost decade if we didn’t get this right then we should stop selling, after years selling this product, and maybe close 100,000 sample sent and cut its key same we are expert in this material and cutting it. So, what you need to know? The blade matters for the smooth cut for example: Saw – Depending on boards you purchase will depend upon the saw, for example first generation boards can be cut with anything for hand saw ups, but second generation you can but its going leave hair and an unsmooth edge, we use Evolution 255mm sliding compound mitre saw and stand to do our cuts and on that bases this is what we would advise, now the blade. First generation boards – you can use a hand cut upwards but for the cleanest and sharpest cut evolution 255mm sliding compound mitre saw and stand is the best. Blade you can use anything from 44 teeth, but above 60 will give you the cleanest cut with first generation. Second generation boards- Now hand saws are out you can you circular or mitre saw, ideally with stand for safety and accuracy, the blade must be above 80+ teeth if you want a clean smooth cut and dur to their strength and durability do expect do through some blades, depending on your project. The movement the core shows slight jagged areas or hair from core change the blade.

Expansion Gaps

Leaving the correct gaps is one of the most critical parts of installing composite decking. This is where we see the most customer errors. The boards need room to expand in the heat.

  • Side-to-Side Gap: Use your hidden fasteners to create a consistent 3mm to 5mm gap. Even when using a 3mm clip, always check the gap as you go.
  • End-to-End Gap: This depends on the temperature on the day of installation.
  • Hot Day (Above 20°C): Leave a 4-6mm gap.
  • Mild Day (5°C to 20°C): Leave a 6-8mm gap.
  • Against a Wall: Always leave a 20mm expansion gap where a board meets a solid object like a house wall.
  • Butt-Joints: Any boards meeting end-to-end must each be supported by double joists, this is. required at every butt joint, with each board end secured with its own clip (both aide at the ends).

Fastening Your Boards: A Guide to Clips vs. Screws

There are two methods for fixing your decking boards to the joists: using a hidden fastening system or screwing directly through the face of the board. For the best aesthetic and performance, we strongly recommend using hidden fasteners.

Important Safety Note: Can you screw directly into composite decking?

You should NEVER screw directly through the face of hollow composite decking boards, as this will result in splitting, cracking, or even screw raising above the boards later down the line. You can screw through solid composite boards, but only if you pre-drill every hole and use specialist composite decking screws.

You can screw through solid composite boards, but only if you pre-drill every hole and use specialist composite decking screws.

Method 1: Hidden Fasteners (The Recommended Choice)

The best practice for a professional and long-lasting finish is to use a hidden fastening system. These are clips (like our Ultra-Clip) that fit into the side groove of the decking board and are then screwed directly into the joist.

The benefits are clear:

A Flawless Surface: There are no visible screw heads on your deck, providing a more visually appealing deck
Board Integrity: This method does not puncture the top surface of the board, maintaining its protective layer
Easy Replacement: Using plastic Clips allows for a single board to be replaced, piece of mind, if its get damaged or you need to lift access under the deck in future

Method 2: Face-Screwing (For Solid Boards Only)

If you choose to screw directly through the face of a solid composite board, it is essential to use the correct type of screw to prevent damage.

Specialist Composite Screws:

To avoid issues like “mushrooming” (where material pushes up around the screw head) and board splitting, you must use screws designed specifically for composite. Look for screws with these features:
A Type 17 drill point to help prevent splitting.
A coarse thread for a stronger, more secure grip in the composite material
A reverse upper thread helps and prevents mushrooming.
A concave head designed to ress material down and create a level finish.

How Many Fixings Do You Need?

Here is a simple calculation based on a standard 3.6m board and 300mm joist centres.

For Hidden Fasteners (Recommended):

Formula: [Board Length in mm] ÷ [Joist Centre in mm] = Clips per board
Example: 3600mm board ÷ 300mm joists = 12 clips per board.
A reverse upper thread helps and prevents mushrooming.
Rule of Thumb: Approx. 100 clips & screws per 4m².

For Face-Fixing Screws:

Formula: ([Board Length in mm] ÷ [Joist Centre in mm]) x 2 = Screws per board
Example: (3600mm board ÷ 300mm joists) x 2 = 24 screws per board.
Rule of Thumb: Approx. 200 screws per 4m².

Which Way Up? The Grooved vs. Wood Grain Answer

Most of our boards are dual-sided. While the final choice is yours, you can use the traditional grooved finish, which has slightly better slip resistance, or wood grain, which benefits from our enhanced surface texture with increased colour stability and a richer, sharper colour tone.

Grooved Finish

  • Pro (Safety):

    The ridges provide improved slip resistance compared to other finishes, as the texture increases traction underfoot — especially in wet conditions.

  • Pro (Drainage):

    The channels actively help water drain off the deck surface, but only if the boards are laid in the same direction as the deck’s gradient.

  • Con (Maintenance):

    The grooves can trap dirt and debris. If not cleaned regularly, this can lead to mould growth, increasing maintenance needs.

  • Con (Mobility):

    The uneven, ridged surface can be slightly more difficult for wheeled items like wheelchairs or garden furniture.

Wood Grain Finish

  • Pro (Aesthetics):

    This is often considered the most natural and authentic appearance, closely mimicking the look of traditional timber — a major priority for many homeowners in the UK.

  • Pro (Cleaning):

    The surface is much easier to clean than a grooved finish, as there are no deep channels for dirt and debris to get trapped in.

  • Pro (Comfort):

    It is more comfortable for walking barefoot, making it an ideal choice for areas around hot tubs, pools, or children’s play areas.

  • Con (Drainage):

    It does not channel water as effectively as a grooved board. This makes it even more critical that the subframe has the correct drainage gradient built into it.

Expert Recommendation:
For the best performance in the UK's wet climate, we recommend installing your boards horizontal to the direction of your entry or walk path for increased slip resistance.

Phase 4: Finishing Touches

Building Safe & Compliant Steps

Building safe steps and having understanding of the building regulations on this is a must. Its key point out there are several ways build steps and our expertise advising would be the “box frame” method for its strength, flexibility and simplicity.

Regulations: To be safe, your steps must follow UK Building Regulations (Approved Document K). The Rise (the vertical height of each step) must be between 150mm and 220mm. The Going or Tread (the depth of each step, or tread) must be at least 220mm. Every step must be identical.

How to Build Your Steps Using the Box Frame Method:

  • Calculate Dimensions:
    First, measure the “Total Rise” (from the ground to the top of your deck). Divide this by a desired rise height (e.g., 180mm) to find the number of steps needed. Adjust the rise until every step is identical and within the 150-220mm range.
  • Build the Boxes:
    Construct your box frames from C24 timber. The height of each box will be your “Rise,” and the depth will be your “Tread.”
  • Create a Foundation:
    The bottom step must sit on a solid foundation, like a small concrete pad or raised from the ground. This supports air flow to reduce rot and decay of your joists.
  • Stack & Secure:
    Build and stack each box, securing them to each other with galvanised structural screws and then to the main deck frame with again galvanised structural screws.
  • Clad the Steps:
    Cover the vertical fronts with riser boards, your choose of board will kick in here and advisable to use 150mm width boards for ease on install and the horizontal tops with two decking boards per step to create the tread. We recommend using a bullnose board for the front edge of each tread for a increased durability and strength.

Finishing Edges: A Professional Guide to Trims, Fascias & Overhangs

A professional finish is what separates a good deck from a great one. Hiding the exposed ends and edges of your boards is crucial for both high-end aesthetics and long-term protection.

Here are the best methods to choose from for your Warrington project, from the most integrated to specific, practical solutions:

Method 1: Picture Framing

This is one of the most popular methods for achieving a high-end, custom look.
A “picture frame” border is created by installing one or more rows of decking boards around the perimeter of your main deck area.
This neatly hides all the cut ends within the frame.

Here are the best methods to choose from for your Warrington project, from the most integrated to specific, practical solutions:

Expert Recommendation:
This method requires careful planning from the subframe stage, as you will need to install extra blocking and joists to fully support the perpendicular border boards.

Method 2: Bullnose Boards

These are solid-core boards with a smooth, rounded edge along one side, specifically engineered to provide a premium, seamless finish for the visible edge of your deck or for stair treads.

They offer a clean, substantial look.

Expert Recommendation:
Bullnose boards must be installed first, before the main body of the deck. This is because they are secured from underneath with starter clips. They cannot be a last-minute addition.

Method 3: Fascia Boards

Fascia boards are a common and stylish way to hide the entire side profile of your subframe. Unlike picture frame boards (which are laid flat), fascia boards are installed vertically against the outer rim joists of your subframe.

Using a fascia board in a contrasting colour to your main deck (e.g., a black fascia with a grey deck) is a very popular technique for creating a sharp, modern look

Method 4: Corner Trims

Corner trims are L-shaped pieces that are fixed over the corner of your completed deck. They neatly cover the cut board ends and hide the grooved sides of the decking boards.

Trims can be fixed using:

  • A high-grade construction adhesive, or
  • Colour-matched screws (always pre-drill the trim first and fix at 300mm intervals).

Method 5: Specialised Solutions

  • End Caps:
    For hollow decking boards, many manufacturers offer custom-moulded plastic end caps that simply plug into the exposed ends.
    This is a quick and easy solution, but you must ensure the caps are compatible with your specific brand of decking.
  • Ground-Level Edging:
    For decks built very low to the ground where fascias won’t fit, you can edge the perimeter with other materials like:

    • Decorative gravel
    • Stone pavers
    • Bricks
      This creates a neat border and helps with water drainage away from the subframe.

A Note on Safe Overhangs

It’s critical not to let your boards overhang the subframe by too much, as this can lead to damage or weakness.

The rule depends on the board’s core:

  • Hollow Boards:
    Should not overhang the subframe by more than 25mm (1 inch).
  • Solid Boards:
    (Like our Bullnose range) can often overhang up to 50mm, but always check your specific product’s installation guide.
Previous ArticlePrevious Article

Everything You Need to Know About Composite Decking Maintenance

Next Article Next Article

Which Outdoor Decking Material is the Best?

Get Your FREE Samples

Find your Perfect Product and and get FREE Sample

Request a Sample
Arrow Icon Back Up