


Eight Ways to Protect a Wooden Deck
How to Make Wooden Planters From Decking
 M. John
 June 27, 2021
-
How to
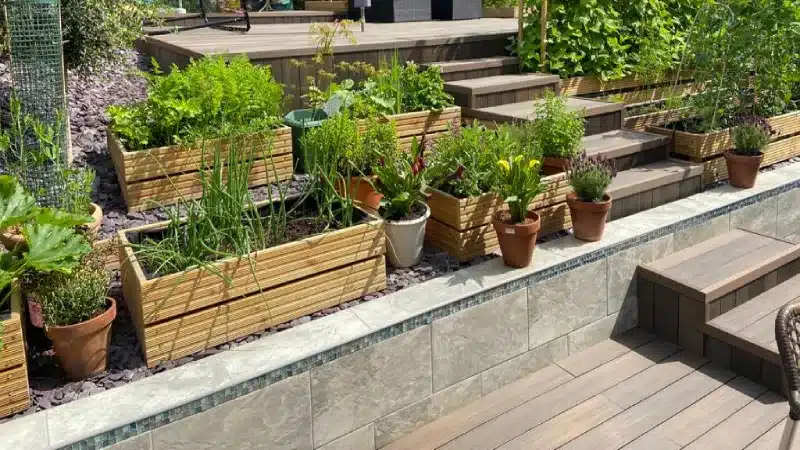
If you love gardening, you can make wooden planters from decking boards or even better leftover decking boards. Composite and wood decking are versatile materials that can be used to make different items other than decking. You can also use it to build planters or raised garden beds to grow plants. A wooden planter is easy to build with decking; you can build it from scratch or even buy a decking planter kit.
DIY Wooden Planters From Decking
Making a planter yourself from scratch is not difficult. It allows you to build any size of planter you want. Apart from that, you can also choose to build your planter in any shape. You can make it a square or a rectangular shape. These are the steps to follow if you want to make wooden planters from decking.
Step 1
Get the Materials Ready
First, gather all the materials needed to make the wooden planters with decking. Once you have all the materials needed, you can now start building your planter. The materials you will need to make a wooden planter with decking are a decking board, a power or manual drill, screws, screwdriver, handsaw or circular saw, measuring tape, and base material.
Step 2
Create Holes
Using measuring tape, calculate the length of the wood and cut it into sizes with a handsaw or circular saw. After cutting the boards to size, use a manual or power drill to make pilot holes in two decking boards. The pilot hole will keep the wood decking from cracking when you insert a screw in it.
Make three pilot holes on two of the boards, the shorter ones. Create holes from the end edge of the board.
Step 3
Fasten the Boards
Attach the boards with galvanised screws. Galvanised screws are suitable for planters; they won’t rust when exposed to air and moisture. Then, line the boards up so that you can position the pilot holes on the outside corners. Then use a power or manual drill to fasten the screws to the boards. If you don’t have a drill, use a screwdriver instead.
Step 4
Attach the Base
The base you will need for a planter is depending upon the surface you are laying on, if you planters are going on soil you can use a cardboard base. If you attaching a wooden decking board base to your planters and laying on a concrete patio then we would advise to make holes in your decking board base and use a landscape fabric liner stapled all around the inside of your planter with some gravel, please ensure water can drainage and a good practise is to pour some water before adding soil to check.
Its important to note that you will need a grid or spaced base if you intend to put the planter on your decking or balcony. This is too allow the excess water to escape and prevent waterlogging.
Some customers use sealant to coat the planter to prevent the wood decking from absorbing water. Apart from that, you can also paint the wooden planters with decking in any colour of your choice. Painting it will make the planter look more attractive. These are of course to be done on the outside of your planter.
Step 5
Fill it With soil.
Now that you have finished making wooden planters with decking, it’s time to fill them with soil. Fill the planter with your garden soil and start using it to grow plants right away. You can place the planter in your garden and use it to grow vegetables or flowers. Besides that, you can also choose to place the wooden planters on your decking or your balcony and use it to grow beautiful flowers.
Wooden Decking Planter Kit
Planter kits are easier to assemble. You don’t need a tool to assemble the planter kit. Most of these kits contain manufacturer instructions on how to assemble them. If yours does not come with a manual, follow the simple steps below.
Step 1
Get the Kit Ready
Get a planter kit from the store according to the size you want. The kits usually contain a grid base and an aeration sheet to promote proper air circulation.
Step 2
Assembling the Kit
Start by laying out the grid base and placing the creation sheet on it. Then we start fastening the wood decking boards to each other. Install the corner posts by attaching each post to the corners of the base grid.
After doing that, attach the wood decking by slipping them into the holes in the corner post. Your planter is ready.
Step 3
Fill the Wooden Planter With Soil
Add soil inside the wooden planters with decking and start using it to grow any plant of your choice.
Conclusion
Making wooden planters from the decking is easy. If you adhere to the guidelines laid out in these write-ups, you will be able to make beautiful wooden planters with decking.
- Share:
-

-
-

Next Article
How to Get Rid of Rats Under Your Decking